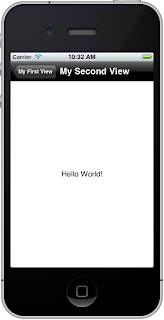
So, why not Master-Detail Application? Well, it's because we HAVE to understand how they do it. Coding it ourselves will not only let us understand, but we LEARN from it.
Let's start!
1. Create Project, Empty Application.
2. Create New File, ViewController. Add Labels and buttons.
3. Import The ViewController class to AppDelegate.h
#import "SampleViewController.h"
4. Create properties for Navigation Controller and SampleViewController in AppDelegate.h
@property (strong, nonatomic) UINavigationController *navController;
@property (strong, nonatomic) SampleViewController *firstVC;
5. Synthesize these properties in AppDelegate.m
@synthesize navController;
@synthesize firstVC;
6. Allocate and initialize the firstVC variable;
7. Allocate and initialize with rootViewcontroller of navController.
8. set rootViewcontroller of appDelegate window.
Your application:didFinishLaunchingWithOptions function in AppDelegate.m should look like this:
- (BOOL)application:(UIApplication *)application didFinishLaunchingWithOptions:(NSDictionary *)launchOptions
{
firstVC = [[FirstViewController alloc] init]; //step6
navController = [[UINavigationController alloc] initWithRootViewController:firstVC]; //step7
self.window = [[UIWindow alloc] initWithFrame:[[UIScreen mainScreen] bounds]];
self.window.backgroundColor = [UIColor whiteColor];
self.window.rootViewController = navController; //step8
[self.window makeKeyAndVisible];
return YES;
}
You may set the Navigation Title of SampleViewController by:
9. Going to SampleViewController.m, under initWithNibName or viewDidLoad function
self.title = @"My First View";
You may set the Navigation bar style to black, opaque, etc by:
10. Going to SampleViewController.m, under viewDidLoad function
self.navigationController.navigationBar.barStyle = UIBarStyleBlack; //UIBarStyleBlackOpaque, UIBarStyleBlackTranslucent, UIBarStyleDefault
11. Hit Run! You should see the Navigation Title as "First View"
Let's now add another ViewController, so that we will see that it navigates from the firstViewController to the second.
12. Add another file, subclass of UIViewController, let's name it SecondViewController.
13. Go to SecondViewController.xib file, add some labels or buttons.
14. Let's add a Navigation Title to our SecondVC, add this code under initWithNibName or viewDidLoad, self.title = @"My Second View"; [same with step 9]
15. Go to FirstViewController class, add an IBAction method, and connect that IBAction to your button in FirstViewController.xib file.
16. Inside your IBAction method, allocate and initialize SecondViewController, remember to import that class first.
SecondViewController *secVC = [[SecondViewController alloc] init];
[self.navigationController pushViewController:secVC animated:YES]; //secVC is the variable name of SecondViewController.
17. Hit Run! You should be able to navigate to the secondVC once you tap the button from the first VC.


hi, can i downlaod the working copy of this code?
ReplyDeleteThanks in advance...
Thank You Bro, Can You Please post a programatical Procedure to create a TAB BAR
ReplyDeletehttp://iosmadesimple.blogspot.com/2012/09/tabbed-application-doing-it.html
Deletevery informative
ReplyDeletehttp://quincetravels.com