Wednesday, August 29, 2012

Navigation-Based Project, Doing it Programmatically

The objective of this tutorial is to be able to make Navigation-Based Projects. But this time, when we create our project, I want you to select "Empty Application" instead of "Master-Detail Application." Master-Detail Application, if you still don't know yet, it creates classes and Xcode puts codes in it that when you run the program, you're done!
So, why not Master-Detail Application? Well, it's because we HAVE to understand how they do it. Coding it ourselves will not only let us understand, but we LEARN from it.

Let's start!


1. Create Project, Empty Application.
2. Create New File, ViewController. Add Labels and buttons.
3. Import The ViewController class to AppDelegate.h
#import "SampleViewController.h"
4. Create properties for Navigation Controller and SampleViewController in AppDelegate.h
@property (strong, nonatomic) UINavigationController *navController;
@property (strong, nonatomic) SampleViewController *firstVC;
5. Synthesize these properties in AppDelegate.m
@synthesize navController;
@synthesize firstVC;
6. Allocate and initialize the firstVC variable; 
7. Allocate and initialize with rootViewcontroller of navController. 
8. set rootViewcontroller of appDelegate window.

Your application:didFinishLaunchingWithOptions function in AppDelegate.m should look like this:
- (BOOL)application:(UIApplication *)application didFinishLaunchingWithOptions:(NSDictionary *)launchOptions
{
    firstVC = [[FirstViewController alloc] init]; //step6
    navController = [[UINavigationController alloc] initWithRootViewController:firstVC]; //step7
    self.window = [[UIWindow alloc] initWithFrame:[[UIScreen mainScreen] bounds]];
    self.window.backgroundColor = [UIColor whiteColor];
    self.window.rootViewController = navController; //step8
    [self.window makeKeyAndVisible];
    return YES;
}

You may set the Navigation Title of SampleViewController by:
9. Going to SampleViewController.m, under initWithNibName or viewDidLoad function
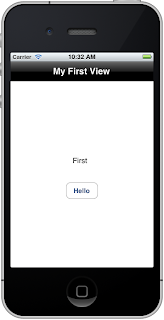
self.title = @"My First View";

You may set the Navigation bar style to black, opaque, etc by:
10. Going to SampleViewController.m, under viewDidLoad function
self.navigationController.navigationBar.barStyle = UIBarStyleBlack; //UIBarStyleBlackOpaque, UIBarStyleBlackTranslucent, UIBarStyleDefault

11. Hit Run! You should see the Navigation Title as "First View"


Let's now add another ViewController, so that we will see that it navigates from the firstViewController to the second.
12. Add another file, subclass of UIViewController, let's name it SecondViewController.
13. Go to SecondViewController.xib file, add some labels or buttons.
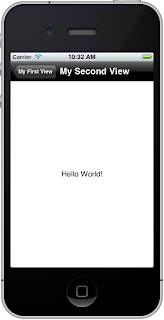
14. Let's add a Navigation Title to our SecondVC, add this code under initWithNibName or viewDidLoad,  self.title = @"My Second View";  [same with step  9]
15. Go to FirstViewController class, add an IBAction method, and connect that IBAction to your button in FirstViewController.xib file.
16. Inside your IBAction method, allocate and initialize SecondViewController, remember to import that class first.
SecondViewController *secVC = [[SecondViewController alloc] init];
[self.navigationController pushViewController:secVC animated:YES]; //secVC is the variable name of SecondViewController.

17. Hit Run! You should be able to navigate to the secondVC once you tap the button from the first VC.


Tuesday, August 28, 2012

Switching to Different Views with UIViewController

Now that we know how to make our own MainWindow.xib, it's about time to know how to switch from different views (with UIViewController).
If you have not read the tutorial on how to make our own MainWindow.xib, please read this first:
http://iosmadesimple.blogspot.com/2012/08/creating-our-own-mainwindowxib-for.html

1. If you still have your xcodeproj when we created MainWindow.xib, please use it before we proceed. Else, do follow the steps from the given link above before you proceed.

2. Let's add a new file, UIViewController subclass, name it FirstViewController.

3. In FirstViewController.h, I "prepared" these lines of code.  Create a UIButton outlet, and an IBAction method for that button.

4. In FirstViewController.m, synthesize your button, and implement the IBAction method we declared in .h file, but let us leave it blank first.

5. In FirstViewController.xib, I dragged a label and button object to the view (white rectangle). Since we created an IBOutlet button property in our .h file, it is expected that we can see our button variable when we 'right-click' the File's Owner (yellowish box).


6. Did you see that circle at the right side of secondViewButton (our button variable name)? We have to drag that to the UIButton object found in our View. Same goes with our IBAction method, we named that function goToSecondView, drag that circle to the button in our View. That means that if the user taps that button in our View, it will trigger an event, whatever happens after tapping that button depends on our code for goToSecondView function.

7. Open AppDelegate.h, import FirstViewController file, and create an outlet variable of FirstViewController.

8. Synthesize your FirstViewController variable, and add the line self.window.rootViewController = firstVC; 
This line means that the very first view that will be shown to the user is the view we created in our FirstViewController class.

9. Go to MainWindow.xib, drag a ViewController object to the Placeholder/Objects Panel. Go to the Identity Inspector of that ViewController object and change its class to FirstViewController.

10. Right-click AppDelegate object (yellow box), look for the variable we created in our .h file, in this case, its named firstVC, and connect it to the ViewController object we dragged awhile ago.

11. Hit "Run" and you should see this in your simulator. This view is from our FirstViewController class, right? If you click that button, nothing happens yet because we left the method (goToSecondView) blank.
If you see this, it means you have successfully linked the FirstViewController to your AppDelegate Class.

12. Create another ViewController subclass, name it SecondViewController. Add two buttons, "back" and "goToThirdViewButton." Prepare the IBAction methods of the two buttons (IBAction)goBack and (IBAction)goToThirdView.

13. Synthesize and implement the functions in SecondViewController.m, but let's leave it blank first.

14. Drag a Label and two Round Rect Button objects to the View. Make the necessary connections needed.

15. Open FirstViewController.m, import SecondViewController and add these lines of code to our (IBAction)goToSecondView method.
SecondViewController *secondVC = [[SecondViewController alloc] init];
[self presentModalViewController:secondVC animated:YES];

16. Open SecondViewController.m, add this line of code for the "back" button method. This code dismisses the secondViewController and shows the FirstViewController.

If you want to go to another view, let's say thirdView, do the same thing for the SecondViewController, create a new class, add a button "back" and implement it. Add the same lines of code from Step 15 to your (IBAction)goToThirdView method.

Run and you should be able to go to different views. :D


Monday, August 27, 2012

Creating our Own MainWindow.xib for Xcode 4.2

MainWindow.xib file is no longer seen in Xcode 4.2. And this is one of the important things a developer should know especially if the developer wants to create UI using Interface Builder.

Let's start!

Create a new Xcode project

Choose Empty Application

Add a Project Name, Company Identifier, for now, let's use iPhone as our device family, others are optional.

Choose a directory where you would like to save your work.

Add a New File.

Click "iOS" category, scroll down and choose an Empty .xib file.

Choose the same Device family from the one you have chosen a while ago when you created your project.

You may name this .xib file anyway you want, but let's just name it "MainWindow."

On your MainWindow.xib, click the "File's Owner," the yellowish box on the left side. Click the Identity Inspector, the third button found on the upper part of the Utilities Panel. Change its Class to "UIApplication."


Search for "Object" in the Objects Library.

Drag it to the "Placeholder/Objects" Panel, the same line with the yellow and reddish box.

Click the dragged Object, and change it's class to your AppDelegate Class.

Search for a Window Object in the Objects Library, drag it to the Placeholder/Objects Panel.

Right-click File's Owner (yellowish box), connect the "delegate" outlet to the AppDelegate Object (yellow box).


Go to AppDelegate.h, add "IBOutlet" to your UIWindow property. Go back to MainWindow.xib, right-click AppDelegate Object, and connect the "window" variable to the Window Object added a while ago.

Click the .xcodeproj file, go to Summary tab, under iPhone / iPod Deployment Info, change the Main Interface to the name of your .xib file. In our example, MainWindow.

Lastly, open AppDelegate.m, under applications:didFinishLaunching:withOptions function, comment out all the codes, but leave these codes:
[self.window makeKeyAndVisible];
    return YES;

You may add UILabels or UIButtons on your window object in Interface Builder, to check that you have successfully connected and created your own MainWindow.xib. You should see your drag and dropped objects when you run it in your simulator.


Done! :)

Blocks From one Class to Another

One popular scenario in using blocks is when you need to update your view after a web service call is finished.