Monday, May 20, 2013

UISplitViewController Landscape

Tutorial Request from Mazrizan Kamisan

We'll have the portrait view in another tutorial which will be a continuation of this landscape tutorial of UISplitViewController.

/*Note: This works in OS versions greater than or equal to iOS 6.0
OS versions less than iOS 6.0 has a different look in its UIPopoverController and doesn't support Landscape Orientation.*/

I studied UISplitViewController by creating a Master Detail Application Template. For sure, you will also be able to understand by looking at its code. For those who want to do it themselves (not just merely creating a Master Detail Application), just follow this tutorial.

1. Create an Empty Application Template.

Select iPad for our Device Family.

2. Add a New File, subclass of UITableViewController, check "With XIB for user interface." This is the view on the left area of our application.

3. Create another File, subclass UIViewController. This is for the bigger area (right panel) of our application. I named it "Detail" view because it acts and shows the detailed view of the cell selected in our tableview (left area).

4. Create a UISplitViewController property in our AppDelegate.h file.

Synthesize the splitViewController property and import the two new files we created from steps 2 and 3 in AppDelegate.m file.

5. Go to AppDelegate.m file and update the didFinishLaunchingWithOptions method such that:
  • Create an instance of the two new classes we created.
  • Allocate and initialize the splitViewController.
  • Set the view controllers of our splitViewController.
    • @[menuVC, detailVC] is just the same as saying [[NSArray alloc] initWithObjectsmenuVCdetailVC, nil];
  • Set the rootViewController of our window to splitViewController.


Hit Run button and you should see something like this.

6. Open PopMenuViewController.h and create a PopMenuDetailViewController property. This will be our "link" to the two view controllers.
Open PopMenuViewController.m file and synthesize the PopMenuDetailViewController property. Also, create an array for our the list that we will be showing in our tableView.

7. Add objects in our array inside our ViewDidLoad method in PopMenuViewController.m file.
self.menu = [[NSArray alloc] initWithObjects@"Menu 1", @"Menu 2"@"Menu 3"];

Update the Table view Data Source methods such that:
  • numberOfSections = 1
  • numberOfRows = array.count
  • cellForRowAtIndexPath >> cell Label will be from our array


8. Open PopMenuDetailViewController.xib file and add a UILabel at the middle of the view. Create an IBOutlet property of the UILabel and connect them.
@property (nonatomic, strong) IBOutlet UILabel *passedObjLabel; // Interface Section
@synthesize passedObjLabel; //Implementation Section


9. Make a function that will update the contents in our Detailed view depending on what was selected from our tableview. For now, let's have a very simple content such as NSString.
- (void)updateMenuLabel:(NSString *)passedObject {
    if (![self.passedObjLabel.text isEqualToString:passedObject]) {
        self.passedObjLabel.text = passedObject;
    }
}

Call this method in our viewDidLoad. You may choose whatever string you want to pass as a default value.

10. In our PopMenuViewController.m file, update table view's delegate method didSelectRowAtIndexPath. This will update the detailed view.
[self.detailViewController updateMenuLabel: [menu objectAtIndex:indexPath.row]];

Hit Run! Make sure you have your simulator in landscape. (If it's in portrait, press CMD + Left key)


But wait! There's more!

How come there's no Navigation Bar on top? I want one!

That's simple! Just edit didFinishLaunchingWithOptions method in our AppDelegate.m. And add a self.title@"My Title" in the initialization function in our Menu and Detailed view controllers. You may also change the tint color of our Navigation Bar according to your preference, add navigation buttons, etc.

Hit Run! 


Download sample code here.

Follow me on my new Twitter Account: @iosmadesimple

UISplitViewController Portrait


/*Note: This works in OS versions greater than or equal to iOS 6.0
OS versions less than iOS 6.0 has a different look in its UIPopoverController and doesn't support Landscape Orientation.*/

Please do continue from where we left off in our UISplitViewController Landscape Tutorial...

1. Add <UISplitViewControllerDelegate> in PopMenuDetailViewController interface header.

2. Add UIPopoverController property in PopMenuDetailViewController interface Section.
@property (strong, nonatomic) UIPopoverController *masterPopoverController;

Synthesize this property:
@synthesize masterPopoverController;

By the way, UIPopoverController is only available in iPad. If you want to make something like this in your iPhone application, you may use third party libraries like WEPopoverController. Download it from github.

3. Copy these SplitView Delegate methods in our PopMenuDetailViewController.m file.


4. In AppDelegate.m file, add this one-line code in didFinishLaunchingWithOptions method after initializing splitViewController.
splitViewController.delegate = detailVC; 

5. Hit Run!


Download Sample Project here.

Thursday, May 9, 2013

3.5 and 4-Inch Screen Compatible

Now that iPhone 5 is in the market, we have to make sure that our apps are compatible to both 3.5-inch screens and 4-inch screens.

That's easy! 

Just check the "Use Autolayout" in our Interface Builder and it will automatically make our 3.5-inch screens compatible to 4-inch screens.

Now, wait!

"Use Autolayout" is useful if the minimum OS requirement is iOS 6 and up. What if your application's minimum OS requirement is, for example, iOS 4.3 and up? You can't use the "Use Autolayout" because your app will definitely crash if you run it in <iOS 6 devices (even in your simulator).
 This is what will happen if you use Autolayout and you're running your app in < i0S 6

The Good News is we have a simple solution for that!

1. First, I created a simple "Single View Application" project. View size is set to Retina 3.5 Full Screen.

Here's how my simple app looks like. No functions, just a simple user interface. We expect that what we see in our Interface Builder, that's what it should also look like when we run it in 3.5-inch screens.


2. Change the Device from 3.5-inch to 4-inch. Make sure that you're in the menu of the iOS Simulator.

If you run the app again in 4-inch screen, this is how it will look like. Everything looks sort of okay. Some of you might really find your UI not in their right places when you run it in a 4-inch screen.

3. Go back to your project and click the view and look for the "Autosizing" function (violet box).
If you can't find the "Autosizing" function and you find this instead (Content Hugging Priority, Constratins, etc)

Go to the first tab of the "Utilities Area" (Right panel) and UNcheck the "Use Autolayout". 

Once done unchecking the "Use Autolayout," you should be able to see the Autosizing function on the fifth tab.

Now, we're ready...

4. Click the View and change the Autosizing such that it will look like this. Tap or click all the vertical and horizontal lines in the inner and outer area of the box.
This means that we want our view to extend or expand its width and height depending on the size of the screen.

5. Next, click the Navigation Bar at the top with the segment control.
This means that we want our Navigation Bar to stick on top and extend its width depending on size of screen. We don't, or rather, we can't tap the inner vertical line of the box.. that means that we cannot change the height of the navigation bar. (And this is true since the height of the NavBar will always be 44.)

6. Same goes for the Label "Great Day," we want it to stick on top of the screen and extend its width depending on the size of the screen.

7. Next, tap the UIImageView.
The Autosizing means that we want our UIImageView to expand its width and height while still sticking on the top. The left and right lines (outer area of the box) means that the UIImageView will be at the middle of the view.

8. For the two buttons, we want them to be at the bottom always, so...


9. Run your application again both in 3.5inch screens and 4-inch screens.
        //4-inch Screen                                          //3.5-inch Screen


Done!


Tuesday, May 7, 2013

SQLite Tutorial Part 2


Credits:

Most of the codes are from Techotopia and I refer this tutorial from their SQLite tutorial 
For more information and detailed discussion, refer to their site. :D

This will be a continuation of our first SQLite Tutorial. We will only edit our previous project so I suggest you go over with SQLite Tutorial Part1 first.

  • Delete the SQLite Tutorial app in your device / simulator since we are going to change the database.
  • Delete the derived data of SQLiteTutorial on your Organizer (upper-right corner of Xcode IDE).


We will be covering the following topics:
1. Having multiple columns in our table named "SAMPLETABLE".
2. Getting all data in SAMPLETABLE (with multiple columns)
3. Search and return data from our SAMPLETABLE.

1. Let's edit our ViewController.xib such that we can enter information of a person.
Change the "keyboard type" of the textfield "Year" so that the user can only input numbers.

2. Create IBOutlet properties for these textfields (and be sure to remove the old IBOutlet we created before for it might cause our program to crash especially that it's no longer connected to any textfields in our view). Synthesize these properties on the Implementation Section.
//Interface Section
@property (strongnonatomic) IBOutlet UITextField *firstNameTextField;
@property (strongnonatomic) IBOutlet UITextField *lastNameTextField;
@property (strongnonatomic) IBOutlet UITextField *courseTextField;
@property (strongnonatomic) IBOutlet UITextField *yearTextField;

//Implementation Section
@synthesize firstNameTextField;
@synthesize lastNameTextField;
@synthesize courseTextField;
@synthesize yearTextField;

3. Connect these outlets to our objects in ViewController.xib.

Remember to set our File's Owner as the delegate of our new textfields (for dismissing the keyboard).
Right-click textField and point the delegate to File's Owner.

4. Remember the prepareDatabase() method we had before in ViewController.m? We'll change the part in our sql_stmt (SQL Statement).
Instead of:
"CREATE TABLE IF NOT EXISTS SAMPLETABLE (ID INTEGER PRIMARY KEY AUTOINCREMENT, MESSAGE TEXT)";


We'll have:
"CREATE TABLE IF NOT EXISTS SAMPLETABLE (ID INTEGER PRIMARY KEY AUTOINCREMENT, FirstName TEXT, LastName TEXT, Course TEXT, Year INT)";


5. We'll also edit the insert_stmt of our addTextToDatabase() method in ViewController.m. It should now look like this:
NSString *insertSQL = [NSString stringWithFormat: @"INSERT INTO SAMPLETABLE (FirstName, LastName, Course, Year) VALUES (\"%@\", \"%@\", \"%@\", \"%@\")",  self.firstNameTextField.textself.lastNameTextField.textself.courseTextField.text, self.yearTextField.text];

Having multiple columns in our table named "SAMPLETABLE" - DONE!


6. In our getTextFromDB method in ListViewController.m, we'll just add a few lines inside our while loop. This loop while (sqlite3_step(statement) == SQLITE_ROW)  will continue to go to the next row until there's no more row to go down with.
while (sqlite3_step(statement) == SQLITE_ROW) {
//NSString *personID = [[NSString alloc] 
                                   initWithUTF8String: (const char *) sqlite3_column_text(statement, 0)];

NSString * firstName = [[NSString alloc]
                                  initWithUTF8String:(const char *) sqlite3_column_text(statement1)]; 

NSString * lastName = [[NSString alloc]
                                  initWithUTF8String:(const char *) sqlite3_column_text(statement2)]; 

NSString * course = [[NSString alloc]
                                  initWithUTF8String:(const char *) sqlite3_column_text(statement3)]; 

NSString * year = [[NSString alloc]
                                  initWithUTF8String:(const char *) sqlite3_column_text(statement4)]; 

                 [list addObject:[NSString stringWithFormat:@"%@ %@ %@-%@", firstName, lastName, course, year]];
            }

Again, the 0, 1, 2, 3, and 4 refers to the column number in our query results. So, IF our query statement is SELECT FirstName, LastName FROM SAMPLETABLE we should expect 2 columns in our query results, right? So to get the first name and last name of the result:


NSString * firstName = [[NSString alloc]
                                  initWithUTF8String:(const char *) sqlite3_column_text(statement0)]; 

NSString * lastName = [[NSString alloc]
                                  initWithUTF8String:(const char *) sqlite3_column_text(statement1)]; 


You may also choose to edit your tableView's cellForRowAtIndexPath method according to your preference.


Getting all data in SAMPLETABLE (with multiple columns)  - DONE!

7. Create a new UIViewController class and import this new class to our AppDelegate. Allocate and initialize the new class and add it in tabbarController's array of viewControllers.

You must now have these lines in your appDelegate's didFinishLaunchingWithOptions method:
SearchViewController *searchVC = [[SearchViewController alloc] initWithNibName:@"SearchViewController" bundle:nil];
 tabController. viewController = [[NSArray  allocinitWithObjects:self.viewController, listVC, searchVC, nil];

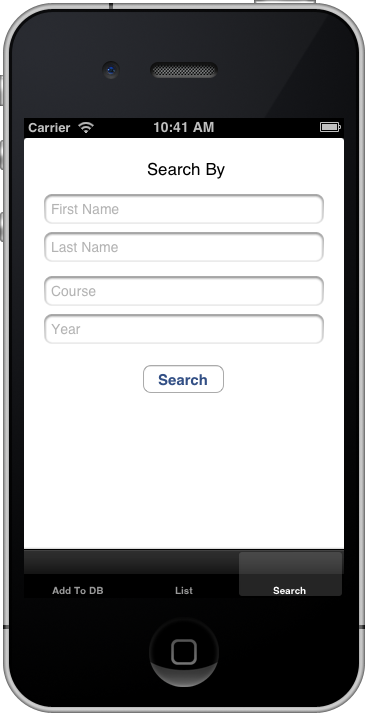
8. Add textfields to our SearchViewController.xib file so the user may choose to search by name, course, or year. Remember also to set the delegates of the textfields to the File's Owner (to dismiss the keyboard).

9. Add <UITextFieldDelegate> to SearchViewController's interface section. And the textFieldShouldReturn method to SearchViewController class.

- (BOOL)textFieldShouldReturn:(UITextField *)textField {
    [textField resignFirstResponder];
    return NO;
}

10. Import sqlite3.h to SearchViewController class. Copy databasePath and myDatabase variables we had from ViewController and ListViewController classes. Create another NSMutableArray for the searchResults.
  • #import <sqlite3.h>

  • @property (strongnonatomic) NSString *databasePath;
  • @property (nonatomic) sqlite3 *myDatabase;
  • @property (strongnonatomicNSMutableArray *searchResult;

  • @synthesize databasePath;
  • @synthesize myDatabase;
  • @synthesize searchResult;


11. Let's create a findStudent method (IBAction). I basically copied the getTextFromDB() method from ListViewController but we will tweak it a little in the SQL Query. Connect this IBAction to the Search Button in our SearchViewController.xib.


- (IBAction) findStudent :(id)sender {
    NSString *docsDir;
    NSArray *dirPaths;
    
    // Get the documents directory
    dirPaths = NSSearchPathForDirectoriesInDomains(NSDocumentDirectoryNSUserDomainMaskYES);
    docsDir = dirPaths[0];
    
    // Build the path to the database file
    databasePath = [[NSString alloc]
                    initWithString: [docsDir stringByAppendingPathComponent:
                                     @"sampleDatabase.db"]];
    
    const char *dbpath = [databasePath UTF8String];
    sqlite3_stmt    *statement;
    
    if (sqlite3_open(dbpath, &myDatabase) == SQLITE_OK)
    {
        NSString *querySQL = [NSString stringWithFormat: @"SELECT * FROM SAMPLETABLE WHERE %@", [self whereClause]]; //whereClause method in Step 12
        
        const char *query_stmt = [querySQL UTF8String];
        
        if (sqlite3_prepare_v2(myDatabasequery_stmt-1, &statementNULL) == SQLITE_OK{
            [searchResult removeAllObjects];
            while (sqlite3_step(statement) == SQLITE_ROW) {
                //NSString *personID = [[NSString alloc] initWithUTF8String: (const char *) sqlite3_column_text(statement, 0)];

NSString * firstName = [[NSString alloc]
                                  initWithUTF8String:(const char *) sqlite3_column_text(statement1)]; 

NSString * lastName = [[NSString alloc]
                                  initWithUTF8String:(const char *) sqlite3_column_text(statement2)]; 

NSString * course = [[NSString alloc]
                                  initWithUTF8String:(const char *) sqlite3_column_text(statement3)]; 

NSString * year = [[NSString alloc]
                                  initWithUTF8String:(const char *) sqlite3_column_text(statement4)]; 
                
                 [searchResult addObject:[NSString stringWithFormat:@"%@ %@ %@-%@", firstName, lastName, course, year]];
            }
           sqlite3_finalize(statement);
        }
        sqlite3_close(myDatabase);
    }
    
    //Result/s of the query will be shown in our Console Area.
    for (int i = 0< [searchResult count]; i++) {
        NSLog(@"Result: %@", [searchResult objectAtIndex:i]);
    }
}


12. I created another method that will append and finalize the where clause of our SQL query.
- (NSString *) whereClause {
    NSString *where = @"";
    BOOL withWhereClause = NO;
    
    if (self.firstNameTextField.text.length > 0) {
        where = [where stringByAppendingString:[NSString stringWithFormat:@"FirstName=\"%@\""self.firstNameTextField.text]];
        withWhereClause = YES;
    }
    if (self.lastNameTextField.text.length > 0) {
        if (withWhereClause) {
            where = [where stringByAppendingString:@" and "];
        }
        where = [where stringByAppendingString:[NSString stringWithFormat:@"LastName=\"%@\""self.lastNameTextField.text]];
        withWhereClause = YES;
    }
    if (self.courseTextField.text.length > 0) {
        if (withWhereClause) {
            where = [where stringByAppendingString:@" and "];
        }
        where = [where stringByAppendingString:[NSString stringWithFormat:@"Course=\"%@\""self.courseTextField.text]];
        withWhereClause = YES;
    }
    if (self.yearTextField.text.length > 0) {
        if (withWhereClause) {
            where = [where stringByAppendingString:@" and "];
        }
        where = [where stringByAppendingString:[NSString stringWithFormat:@"Year=\"%@\""self. yearTextField.text]];
    }
    //NSLog(@"where clause: %@", where);
    return where;
}

Search and return data from our SAMPLETABLE - DONE!

Hit Run!


Download Sample Project here.


Blocks From one Class to Another

One popular scenario in using blocks is when you need to update your view after a web service call is finished.