Tuesday, May 7, 2013

SQLite Tutorial Part 2


Credits:

Most of the codes are from Techotopia and I refer this tutorial from their SQLite tutorial 
For more information and detailed discussion, refer to their site. :D

This will be a continuation of our first SQLite Tutorial. We will only edit our previous project so I suggest you go over with SQLite Tutorial Part1 first.

  • Delete the SQLite Tutorial app in your device / simulator since we are going to change the database.
  • Delete the derived data of SQLiteTutorial on your Organizer (upper-right corner of Xcode IDE).


We will be covering the following topics:
1. Having multiple columns in our table named "SAMPLETABLE".
2. Getting all data in SAMPLETABLE (with multiple columns)
3. Search and return data from our SAMPLETABLE.

1. Let's edit our ViewController.xib such that we can enter information of a person.
Change the "keyboard type" of the textfield "Year" so that the user can only input numbers.

2. Create IBOutlet properties for these textfields (and be sure to remove the old IBOutlet we created before for it might cause our program to crash especially that it's no longer connected to any textfields in our view). Synthesize these properties on the Implementation Section.
//Interface Section
@property (strong, nonatomic) IBOutlet UITextField *firstNameTextField;
@property (strong, nonatomic) IBOutlet UITextField *lastNameTextField;
@property (strong, nonatomic) IBOutlet UITextField *courseTextField;
@property (strong, nonatomic) IBOutlet UITextField *yearTextField;

//Implementation Section
@synthesize firstNameTextField;
@synthesize lastNameTextField;
@synthesize courseTextField;
@synthesize yearTextField;

3. Connect these outlets to our objects in ViewController.xib.

Remember to set our File's Owner as the delegate of our new textfields (for dismissing the keyboard).
Right-click textField and point the delegate to File's Owner.

4. Remember the prepareDatabase() method we had before in ViewController.m? We'll change the part in our sql_stmt (SQL Statement).
Instead of:
"CREATE TABLE IF NOT EXISTS SAMPLETABLE (ID INTEGER PRIMARY KEY AUTOINCREMENT, MESSAGE TEXT)";


We'll have:
"CREATE TABLE IF NOT EXISTS SAMPLETABLE (ID INTEGER PRIMARY KEY AUTOINCREMENT, FirstName TEXT, LastName TEXT, Course TEXT, Year INT)";


5. We'll also edit the insert_stmt of our addTextToDatabase() method in ViewController.m. It should now look like this:
NSString *insertSQL = [NSString stringWithFormat: @"INSERT INTO SAMPLETABLE (FirstName, LastName, Course, Year) VALUES (\"%@\", \"%@\", \"%@\", \"%@\")",  self.firstNameTextField.text, self.lastNameTextField.text, self.courseTextField.text, self.yearTextField.text];

Having multiple columns in our table named "SAMPLETABLE" - DONE!


6. In our getTextFromDB method in ListViewController.m, we'll just add a few lines inside our while loop. This loop while (sqlite3_step(statement) == SQLITE_ROW)  will continue to go to the next row until there's no more row to go down with.
while (sqlite3_step(statement) == SQLITE_ROW) {
//NSString *personID = [[NSString alloc] 
                                   initWithUTF8String: (const char *) sqlite3_column_text(statement, 0)];

NSString * firstName = [[NSString alloc]
                                  initWithUTF8String:(const char *) sqlite3_column_text(statement, 1)]; 

NSString * lastName = [[NSString alloc]
                                  initWithUTF8String:(const char *) sqlite3_column_text(statement, 2)]; 

NSString * course = [[NSString alloc]
                                  initWithUTF8String:(const char *) sqlite3_column_text(statement, 3)]; 

NSString * year = [[NSString alloc]
                                  initWithUTF8String:(const char *) sqlite3_column_text(statement, 4)]; 

                 [list addObject:[NSString stringWithFormat:@"%@ %@ %@-%@", firstName, lastName, course, year]];
            }

Again, the 0, 1, 2, 3, and 4 refers to the column number in our query results. So, IF our query statement is SELECT FirstName, LastName FROM SAMPLETABLE we should expect 2 columns in our query results, right? So to get the first name and last name of the result:


NSString * firstName = [[NSString alloc]
                                  initWithUTF8String:(const char *) sqlite3_column_text(statement, 0)]; 

NSString * lastName = [[NSString alloc]
                                  initWithUTF8String:(const char *) sqlite3_column_text(statement, 1)]; 


You may also choose to edit your tableView's cellForRowAtIndexPath method according to your preference.


Getting all data in SAMPLETABLE (with multiple columns)  - DONE!

7. Create a new UIViewController class and import this new class to our AppDelegate. Allocate and initialize the new class and add it in tabbarController's array of viewControllers.

You must now have these lines in your appDelegate's didFinishLaunchingWithOptions method:
SearchViewController *searchVC = [[SearchViewController alloc] initWithNibName:@"SearchViewController" bundle:nil];
 tabController. viewController = [[NSArray  alloc] initWithObjects:self.viewController, listVC, searchVC, nil];

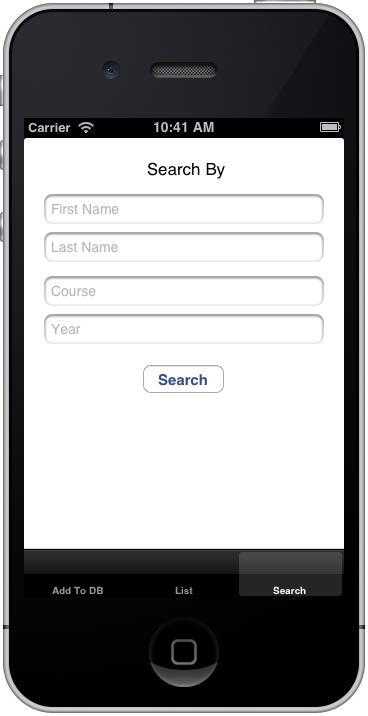
8. Add textfields to our SearchViewController.xib file so the user may choose to search by name, course, or year. Remember also to set the delegates of the textfields to the File's Owner (to dismiss the keyboard).

9. Add <UITextFieldDelegate> to SearchViewController's interface section. And the textFieldShouldReturn method to SearchViewController class.

- (BOOL)textFieldShouldReturn:(UITextField *)textField {
    [textField resignFirstResponder];
    return NO;
}

10. Import sqlite3.h to SearchViewController class. Copy databasePath and myDatabase variables we had from ViewController and ListViewController classes. Create another NSMutableArray for the searchResults.
  • #import <sqlite3.h>

  • @property (strong, nonatomic) NSString *databasePath;
  • @property (nonatomic) sqlite3 *myDatabase;
  • @property (strong, nonatomic) NSMutableArray *searchResult;

  • @synthesize databasePath;
  • @synthesize myDatabase;
  • @synthesize searchResult;


11. Let's create a findStudent method (IBAction). I basically copied the getTextFromDB() method from ListViewController but we will tweak it a little in the SQL Query. Connect this IBAction to the Search Button in our SearchViewController.xib.


- (IBAction) findStudent :(id)sender {
    NSString *docsDir;
    NSArray *dirPaths;
    
    // Get the documents directory
    dirPaths = NSSearchPathForDirectoriesInDomains(NSDocumentDirectory, NSUserDomainMask, YES);
    docsDir = dirPaths[0];
    
    // Build the path to the database file
    databasePath = [[NSString alloc]
                    initWithString: [docsDir stringByAppendingPathComponent:
                                     @"sampleDatabase.db"]];
    
    const char *dbpath = [databasePath UTF8String];
    sqlite3_stmt    *statement;
    
    if (sqlite3_open(dbpath, &myDatabase) == SQLITE_OK)
    {
        NSString *querySQL = [NSString stringWithFormat: @"SELECT * FROM SAMPLETABLE WHERE %@", [self whereClause]]; //whereClause method in Step 12
        
        const char *query_stmt = [querySQL UTF8String];
        
        if (sqlite3_prepare_v2(myDatabase, query_stmt, -1, &statement, NULL) == SQLITE_OK) {
            [searchResult removeAllObjects];
            while (sqlite3_step(statement) == SQLITE_ROW) {
                //NSString *personID = [[NSString alloc] initWithUTF8String: (const char *) sqlite3_column_text(statement, 0)];

NSString * firstName = [[NSString alloc]
                                  initWithUTF8String:(const char *) sqlite3_column_text(statement, 1)]; 

NSString * lastName = [[NSString alloc]
                                  initWithUTF8String:(const char *) sqlite3_column_text(statement, 2)]; 

NSString * course = [[NSString alloc]
                                  initWithUTF8String:(const char *) sqlite3_column_text(statement, 3)]; 

NSString * year = [[NSString alloc]
                                  initWithUTF8String:(const char *) sqlite3_column_text(statement, 4)]; 
                
                 [searchResult addObject:[NSString stringWithFormat:@"%@ %@ %@-%@", firstName, lastName, course, year]];
            }
           sqlite3_finalize(statement);
        }
        sqlite3_close(myDatabase);
    }
    
    //Result/s of the query will be shown in our Console Area.
    for (int i = 0; i < [searchResult count]; i++) {
        NSLog(@"Result: %@", [searchResult objectAtIndex:i]);
    }
}


12. I created another method that will append and finalize the where clause of our SQL query.
- (NSString *) whereClause {
    NSString *where = @"";
    BOOL withWhereClause = NO;
    
    if (self.firstNameTextField.text.length > 0) {
        where = [where stringByAppendingString:[NSString stringWithFormat:@"FirstName=\"%@\"", self.firstNameTextField.text]];
        withWhereClause = YES;
    }
    if (self.lastNameTextField.text.length > 0) {
        if (withWhereClause) {
            where = [where stringByAppendingString:@" and "];
        }
        where = [where stringByAppendingString:[NSString stringWithFormat:@"LastName=\"%@\"", self.lastNameTextField.text]];
        withWhereClause = YES;
    }
    if (self.courseTextField.text.length > 0) {
        if (withWhereClause) {
            where = [where stringByAppendingString:@" and "];
        }
        where = [where stringByAppendingString:[NSString stringWithFormat:@"Course=\"%@\"", self.courseTextField.text]];
        withWhereClause = YES;
    }
    if (self.yearTextField.text.length > 0) {
        if (withWhereClause) {
            where = [where stringByAppendingString:@" and "];
        }
        where = [where stringByAppendingString:[NSString stringWithFormat:@"Year=\"%@\"", self. yearTextField.text]];
    }
    //NSLog(@"where clause: %@", where);
    return where;
}

Search and return data from our SAMPLETABLE - DONE!

Hit Run!


Download Sample Project here.


Sunday, May 5, 2013

SQLite Tutorial Part 1


Credits:

Most of the codes are from Techotopia and I refer this tutorial from their SQLite tutorial 
For more information and detailed discussion, refer to their site. :D


This is what we will be trying to achieve in this first Tutorial. (Yes, I'm gonna have a Part 2 of SQLite Tutorial)


Prerequisite:

1. SQLite or MySQL
2. Creating Tabbed Views
3. Adding UITableView

1. Create a Single View Application Template.
2. Add SQLite dynamic library in Build Phases under "Link Binary With Libraries."


3. Add a New File, subclass of UITableViewController. In my case, I named it "ListViewController." We will use this class to show all the added entries from our database in to this table.


4. Add a UITabBarController variable in our AppDelegate.
@property (strong, nonatomic) UITabBarController *tabController; //Interface Section
@synthesize tabController; //Implementation Section


5. Edit AppDelegate's ApplicationDidFinishLaunchingWithOptions method:

- (BOOL)application:(UIApplication *)application didFinishLaunchingWithOptions:(NSDictionary *)launchOptions {
    self.window = [[UIWindow alloc] initWithFrame:[[UIScreen mainScreen] bounds]];
    // Override point for customization after application launch.
    
    tabController = [[UITabBarController alloc] init];
    self.viewController = [[ViewController  alloc] initWithNibName:@"ViewController" bundle:nil];
    ListViewController *listVC = [[ListViewController alloc] initWithStyle:UITableViewStylePlain];
    tabController. viewController = [[NSArray  alloc] initWithObjects:self.viewController, listVC, nil];
     self.window.rootViewController = self.tabController;
    [self.window makeKeyAndVisible];
    return YES;
}

6. #import <sqlite3.h> to ViewController and ListViewController classes.

Try to Build and Run your program to make sure that nothing's wrong when you imported sqlite3.

7. Let's create variables for our databasePath (NSString *) and our database (sqlite3 *) to ViewController and ListViewController classes.
@property (strong, nonatomic)  NSString *databasePath;
@property (nonatomic)  sqlite3 *myDatabase;

8. Add a textfield and a button to our ViewController.xib file. The user enters any message inside our textfield and when the user taps the button, it will be added to our database.

Create an IBOutlet property for our textfield and connect it to our object in our xib file. Remember also to synthesize the UITextField property.
@property (strong, nonatomic)  IBOutlet UITextField *textField; //Interface section
@synthesize textField; //Implementation section

9. Prepare an IBAction method for our button. 
- (IBAction) addTextToDatabase:(id) sender {
     //We will add the codes later. 
}
Connect this IBAction to our button object in our xib file.

10. Prepare and create our database if it has not existed yet. Call this method inside our viewDidLoad in ViewController.m (You may disregard the UIAlertView codes.)

- (void)prepareDatabase {
    // Get the documents directory
    NSArray *dirPaths = NSSearchPathForDirectoriesInDomains(NSDocumentDirectory, NSUserDomainMask, YES);
    NSString *docsDir = dirPaths[0];
    
    // Build the path to the database file. We declared databasePath on Step 7
   databasePath = [[NSString alloc] initWithString: [docsDir stringByAppendingPathComponent:@"sampleDatabase.db"]];
    //NSLog(@"DB Path: %@", databasePath);
    
    NSFileManager *filemgr = [NSFileManager defaultManager];
    
    if ([filemgr fileExistsAtPath: databasePath ] == NO) {
        const char *dbpath = [databasePath UTF8String];
        if (sqlite3_open(dbpath, &myDatabase) == SQLITE_OK) {  //We declared myDatabase on Step 7
            char *errMsg;
            const char *sql_stmt = "CREATE TABLE IF NOT EXISTS SAMPLETABLE (ID INTEGER PRIMARY KEY AUTOINCREMENT, MESSAGE TEXT)";

/*
Name of Our Database: sampleDatabase.db
Name of Our Table: SAMPLETABLE
Columns in SAMPLTABLE: ID & Message
Datatype of Message: Text
*/
            
            if (sqlite3_exec(myDatabase, sql_stmt, NULL, NULL, &errMsg) != SQLITE_OK) {
                statusOfAddingToDB = @"Failed to create table"; //iVariable statusOfAddingToDB (NSString *) 
            } else {
                statusOfAddingToDB = @"Success in creating table";
            }


            UIAlertView *alert = [[UIAlertView alloc] initWithTitle:@"DB Status" message: statusOfAddingToDB delegate:nil cancelButtonTitle:@"OK" otherButtonTitles: nil];
            [alert show];


            sqlite3_close(myDatabase);
        } else {
            statusOfAddingToDB = @"Failed to open/create database";
            UIAlertView *alert = [[UIAlertView alloc] initWithTitle:@"DB Status" message: statusOfAddingToDB delegate:nil cancelButtonTitle:@"OK" otherButtonTitles: nil];
            [alert show];
        }
    }
}

Our viewDidLoad in ViewController.m must now look like this:


- (void)viewDidLoad {
    [super viewDidLoad];
// Do any additional setup after loading the view, typically from a nib.
    self.title = @"Add To DB"; //For the tab title of our TabController
    [self prepareDatabase];
}


11. Add Entry to Database

- (IBAction)addTextToDatabase:(id)sender {
    sqlite3_stmt    *statement;
    const char *dbpath = [databasePath UTF8String];
    
    if (sqlite3_open(dbpath, &myDatabase) == SQLITE_OK) {
        NSString *insertSQL = [NSString stringWithFormat:
                               @"INSERT INTO SAMPLETABLE (MESSAGE) VALUES (\"%@\")",
                               self.textField.text];
        
        const char*insert_stmt = [insertSQL UTF8String];
        sqlite3_prepare_v2(myDatabase, insert_stmt,  -1, &statement, NULL);
        if (sqlite3_step(statement) == SQLITE_DONE) {
            statusOfAddingToDB = [NSString stringWithFormat:@"Text added -- %@", textField.text];
        } else {
            statusOfAddingToDB = @"Failed to add contact";
        }
        
        UIAlertView *alert = [[UIAlertView alloc] initWithTitle:@"DB Status" message: statusOfAddingToDB delegate:nil cancelButtonTitle:@"OK" otherButtonTitles: nil];
            [alert show];
        
        sqlite3_finalize(statement);
        sqlite3_close(myDatabase);
    }
}

12. I also added a UITextFieldDelegate to dismiss our keyboard after the user types in our textfield.

- (BOOL)textFieldShouldReturn:(UITextField *)tf {
    if (tf == textField) {
        [tf resignFirstResponder];
    }
    return NO;
}

ListViewController Class (UITableView)

I assume you did Steps 6 and 7 to ListViewController Class.

13. Add an NSMutableArray property to this class. Synthesize this property also. 

@property (strong, nonatomic) NSMutableArray *list; //Interface Section
@synthesize list; //Implementation Section

14. Add a tab title for our TabController in initWithStyle method of ListViewController.m.
- (id)initWithStyle:(UITableViewStyle)style {
    self = [super initWithStyle:style];
    if (self) {
        self.title = @"List"; //tab title
    }
    return self;
}

15. Let's get the data we want from our database.

- (void)getTextFomDB {
    NSString *docsDir;
    NSArray *dirPaths;
    
    // Get the documents directory
    dirPaths = NSSearchPathForDirectoriesInDomains(NSDocumentDirectory, NSUserDomainMask, YES);
    docsDir = dirPaths[0];
    
    // Build the path to the database file
    databasePath = [[NSString alloc]
                    initWithString: [docsDir stringByAppendingPathComponent:
                                     @"sampleDatabase.db"]];
    
    const char *dbpath = [databasePath UTF8String];
    sqlite3_stmt    *statement;
    
    if (sqlite3_open(dbpath, &myDatabase) == SQLITE_OK)
    {
        //Select all from SAMPLETABLE. This includes the 'id' column and 'message' column.
        NSString *querySQL = @"SELECT * FROM SAMPLETABLE"; 
        const char *query_stmt = [querySQL UTF8String];
        
        if (sqlite3_prepare_v2(myDatabase, query_stmt, -1, &statement, NULL) == SQLITE_OK) {
            [list removeAllObjects];
            while (sqlite3_step(statement) == SQLITE_ROW) {
                NSString *text = [[NSString alloc]
                                  initWithUTF8String:(const char *) sqlite3_column_text(statement, 1)]; //Num 1 means on what column. Column 0 = 'id' column while Column 1 = 'message' column in our query result.

                [list addObject:text];
                //NSLog(@"count: %d", [list count]);
            }
            sqlite3_finalize(statement);
        }
        sqlite3_close(myDatabase);
    }
}

16. We call this method getTextFromDB in our viewWillAppear method. So that every time this view will be shown, it will get the data again from our database. Then reloadData to our tableview.
- (void)viewWillAppear:(BOOL)animated {
    [self getTextFomDB];
    [self.tableView reloadData];
}

17. Hope you are already familiar with UITableview's delegate and datasource methods. Edit the following methods such that:
  • numberOfSectionsInTableView == 1
  • numberOfRowsInSection == total number of elements in our NSMutableArray
  • cellForRowAtIndexPath --> set cell's textLabel = text in our NSMutableArray

SQLite Tutorial Part 2 will cover the following:

  1. Having multiple columns in one (DB) table.
  2. Getting all data in our (DB) table (with multiple columns)
  3. Search and return data from our (DB) table.

Download Sample Project here.


Sunday, April 28, 2013

Lazy Image Loading

Tutorial request from Senthil.P

1. Create a new Xcode Project, Single View Application template and add a tableview. (http://iosmadesimple.blogspot.com/2012/10/adding-uitableview-tutorial.html)

2. Create a custom table view cell.
(http://iosmadesimple.blogspot.com/2012/10/uitableviewcell-using-interface-builder.html)

3. Download SDWebImage latest framework here. (https://github.com/rs/SDWebImage/wiki/Download-Complied-Framework)

Assuming everything's done, what's left for us to do is to include SDWebImage Library and use it in our project.


4. Right-click to your Project Navigator, Add Files to your project.

Add "SDWebImage.framework" from the one you downloaded from Step 3. Check "Copy items into destination group's folder (if needed)"


5. In our project's Build Phases, under Link Binary With Libraries, click the ( + ) button.

And add "ImageIO.framework."
6. In our Project's Build Settings, search for "Other Linker Flags," double-click the right area of the "Other Linker Flags," click ( + ) button and input -ObjC


7. In the source files where you need to use the library,
#import <SDWebImage/UIImageView+WebCache.h>

8. Add an image file that will be used as our "placeholder" image. This image will be shown while the image from the URL has not yet finished loading.


9. Add entries to your array that holds the important information like the URL of the images you want to load.
- (void)viewDidLoad
{
    [super viewDidLoad];
// Do any additional setup after loading the view, typically from a nib.
    
    items = [[NSMutableArray alloc] init];
    [items addObject:@"http://i0.wp.com/hypebeast.com/image/2013/01/hot-toys-iron-man-3-mark-xlii-collectible-bust_1.jpg?w=1410"];
    [items addObject:@"http://t0.gstatic.com/images?q=tbn:ANd9GcT4PZc648WRoXzxEdLQA9zMGqBx93_um_HxvsjgYhoY3AvDtkzI"];
    [items addObject:@"http://i0.wp.com/hypebeast.com/image/2013/03/hot-toys-iron-man-3-iron-patriot-collectible-bust-2.jpg?w=930"];
    [items addObject:@"http://t3.gstatic.com/images?q=tbn:ANd9GcTf_6e7G9pIiw7ZlRRPfdq63NP-jRA6tmstL1ji-ZFEVnTkDjSp"];
    [items addObject:@"https://blogger.googleusercontent.com/img/b/R29vZ2xl/AVvXsEinO2ufQwjCMHOhzFl6EcKEfs-4zkXEtX1FOQmAp7vUl3tCs0ome9KUOU_bAZdla02lwhdpOOyZMTl1S8vvvclt5HsyUpq9MJZl9GVzS8SWdwHJdZjO6ynYkdC3XB_TYZDdI_JGGpIs2Fk/s1600/iron-man-3.jpg"];
}

10. Edit our tableview's cellForRowAtIndexPath...
- (UITableViewCell *)tableView:(UITableView *)tableView cellForRowAtIndexPath:(NSIndexPath *)indexPath{
    static NSString *CellIdentifier = @"MyImageCell";
    ImageCell *cell = (ImageCell *) [tableView dequeueReusableCellWithIdentifier:CellIdentifier];
    
    if (cell == nil) {
        NSArray* topLevelObjects = [[NSBundle mainBundle] loadNibNamed:@"ImageCell" owner:self options:nil];
        for (id currentObject in topLevelObjects) {
            if ([currentObject isKindOfClass:[UITableViewCell class]]) {
                cell = (ImageCell *)currentObject;
                break;
            }
        }
    }
    
    // Here we use the new provided setImageWithURL: method to load the web image
    [cell.imageView setImageWithURL:[NSURL URLWithString:[items objectAtIndex:indexPath.row]]  placeholderImage:[UIImage imageNamed:@"Hisoka.jpg"]];
    cell.imageSource.text = [items objectAtIndex:indexPath.row];
    
    return cell;
}

11. Hit Run!


There are still many ways to use SDWebImage Library, just check their API Documentation and other ways to use it in: (https://github.com/rs/SDWebImage)

Download Project here.


Tuesday, April 9, 2013

Adding/Deleting Rows Dynamically (UITableView)

To answer Mr. Ramanan R Rengaraj's question "How to add an add and delete button in nav bar to insert / delete rows dynamically."

Prerequisite:
1. UITableView (http://iosmadesimple.blogspot.com/2012/10/adding-uitableview-tutorial.html)
2. UINavigationController (http://iosmadesimple.blogspot.com/2012/08/navigation-based-project-doing-it.html)

This tutorial will be based mainly from the UITableView tutorial, I'm only going to tweak it a little so we can add and delete rows dynamically.

Let's start!

1. Create a new Xcode Project, and choose a Single View Application template. After creating a Single View Application Project, you will see that there is an AppDelegate and a ViewController class. We will not be using the ViewController class, you may choose to delete it from your project.


2. Create a New File, Objective-C class, subclass of UITableViewController. In my case, I named it MyTableViewController.

3. Click MyTableViewController.xib file, select the tableview.  Choose the "Grouped" Style under Table View. 
//You may choose to change the View size from Retina 4 Full Screen to Retina 3.5 Full Screen under Simulated Metrics.

Grouped Style Table View allows us to see the adding and deleting of rows dynamically.

4. Select the AppDelegate.h file, import MyTableViewController class. Add a MyTableViewController property and a UINavigationController property. Synthesize these properties in your AppDelegate.m file.

@property (strong, nonatomic) MyTableViewController *viewController;
@property (strong, nonatomic) UINavigationController *navController;

5. Go to AppDelegate.m file, under ApplicationDidFinishLaunchingWithOptions method, create and initialize your viewController property. Next, create and initialize your navController such that your navController's rootViewController is your viewController variable. Set window's rootViewController with your navController.

- (BOOL)application:(UIApplication *)application didFinishLaunchingWithOptions:(NSDictionary *)launchOptions {
    self.window = [[UIWindow alloc] initWithFrame:[[UIScreen mainScreen] bounds]];
    // Override point for customization after application launch.
    
    self.viewController = [[MyTableViewController alloc] initWithNibName:@"MyTableViewController" bundle:nil];
    self.navController = [[UINavigationController alloc] initWithRootViewController:self. viewController];
    self.window.rootViewController = self.navController;
    [self.window makeKeyAndVisible];
    return YES;
}


6. Go to MyTableViewController.m file. Create an array variable (NSMutableArray) for the list of items we want to show in our tableView. I also have an int variable which will be useful for this tutorial.
NSMutableArray *items;
int num;


7. Under viewDidLoad of MyTableViewController, we will set the title and the items in our array, set the num of our int variable and create the two navigation buttons for add and delete.

 // Set Title
self.title = @"Items";

// Set initial values in our array
items = [[NSMutableArray alloc] initWithObjects:@"Item No. 1", @"Item No. 2", @"Item No. 3", @"Item No. 4", @"Item No. 5", @"Item No. 6", nil];


// Set int variable, since our last item number is six, we will also set this int variable to six.
num = 6;

// create the two navigation buttons
    UIBarButtonItem *addButton = [[UIBarButtonItem alloc]
                                   initWithTitle:@"Add"
                                   style:UIBarButtonItemStyleBordered
                                   target: self
                                   action:@selector(addItemToArray)];
    self.navigationItem.rightBarButtonItem = addButton;
    
    UIBarButtonItem *delButton = [[UIBarButtonItem alloc]
                                  initWithTitle:@"Del"
                                  style: UIBarButtonItemStyleBordered
                                  target: self
                                  action:@selector(delItemToArray)];
    self.navigationItem.leftBarButtonItem = delButton;


8. Implement the addItemToArray and delItemToArray methods in our MyTableViewController class.
//Add Item To Array
- (void)addItemToArray {
    num++;
    [items addObject:[NSString stringWithFormat:@"Item No. %d", num];
    [self.tableView reloadData];
}


//Delete Item To Array
- (void)delItemToArray {
    num--;
    [items removeLastObject];
    [self.tableView reloadData];
}

9. Lastly, let's update the codes in our TableView Data Source methods. 
//The codes in our Data Source methods are just the same with the codes on our previous UITableView tutorial.
#pragma mark - Table view data source
- (NSInteger)numberOfSectionsInTableView:(UITableView *)tableView {
    // Return the number of sections.
    return 1;
}

- (NSInteger)tableView:(UITableView *)tableView numberOfRowsInSection:(NSInteger)section{
    // Return the number of rows in the section.
    // Usually the number of items in your array (the one that holds your list)
    return [items count];
}

- (UITableViewCell *)tableView:(UITableView *)tableView cellForRowAtIndexPath:(NSIndexPath *)indexPath{
    //Where we configure the cell in each row

    static NSString *CellIdentifier = @"Cell";
    UITableViewCell *cell;
    
    cell = [tableView dequeueReusableCellWithIdentifier:CellIdentifier];
    if (cell == nil) {
        cell = [[UITableViewCell alloc] initWithStyle:UITableViewCellStyleDefault reuseIdentifier:CellIdentifier];
    }
    // Configure the cell... setting the text of our cell's label
    cell.textLabel.text = [items objectAtIndex:indexPath.row];
    return cell;
}


10. Done! Hit Run!

//At first run, we'll see the initial values in our array.

//Hit Add button.


//Hit Delete Button.

Download Project Code 

Blocks From one Class to Another

One popular scenario in using blocks is when you need to update your view after a web service call is finished.